

Screen recording on an iPhone opens up a realm of possibilities, allowing you to capture and share your device’s activities. Whether it’s creating informative tutorials, showcasing gameplay, or recording content that’s challenging to save otherwise, the built-in screen recording feature is a valuable tool.
RELATED : Enhance Your Writing Skills and Organization: 10 Innovative Uses of ChatGPT
RELATED : Artificial intelligence where does Africa stand?
RELATED : How Stadium camera Works, Set up When broadcasting Live matches
RELATED : Ensuring Account Security: Instagram’s Latest Initiatives
Table of Contents
- Introduction
- Steps to Screen Record on iPhone
- Additional Tips and Customization
- Frequently Asked Questions (FAQs)
- Conclusion
Introduction
Screen recording on an iPhone opens up a realm of possibilities, allowing you to capture and share your device’s activities. Whether it’s creating informative tutorials, showcasing gameplay, or recording content that’s challenging to save otherwise, the built-in screen recording feature is a valuable tool.
Steps to Screen Record on iPhone
- Open the Control Center:
- On iPhone X and later, swipe down from the top right corner.
- On earlier iPhone models, swipe up from the bottom of the screen.
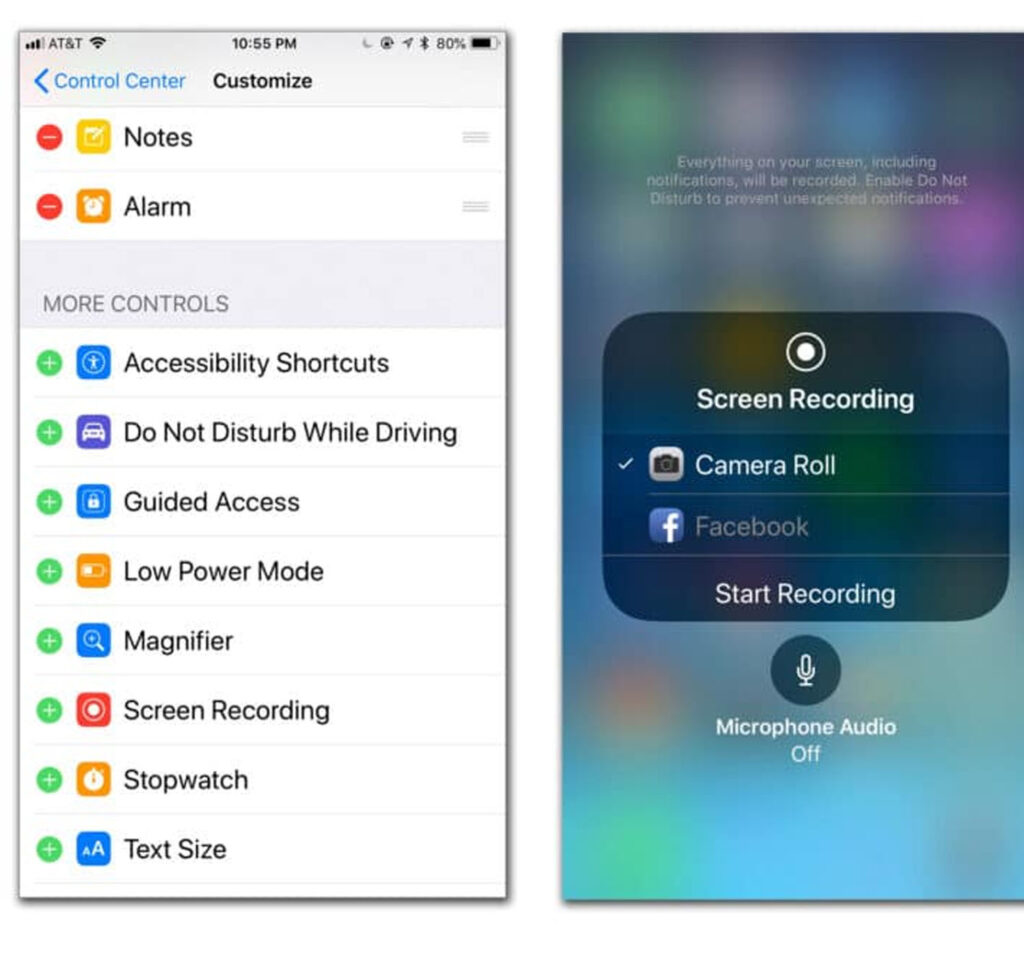
- Tap the Screen Recording Button:
- Identify the icon resembling a circle with a dot inside.
- Wait for the Countdown:
- A three-second countdown will initiate, indicating the start of the screen recording.
- The red status bar at the top confirms the ongoing recording.
- Stop the Recording:
- To conclude, tap the red status bar at the top of the screen.
- Then, tap “Stop.”
- Access the Recording:
- Find the recorded video conveniently saved in your Photos app.
Note: If the Screen Recording option isn’t visible in the Control Center, navigate to Settings > Control Center > Customize Controls. Add Screen Recording by tapping the green plus icon.
RELATED : WhatsApp’s Move: Devices Losing Support in 2023 – Check If Yours Is on the List
RELATED : Top Laptops of 2023: Unveiling the Finest Picks for Every User
RELATED : Best Laptop 2023 — Our Top December Picks
RELATED : 5 Remarkable Feats Achieved with ChatGPT 2023
Additional Tips and Customization
- Add External Audio:
- Enhance your recording by enabling external audio through the microphone.
- Long-press or 3D Touch the Screen Recording button in the Control Center to access audio settings.
- Customize Controls:
- Tailor your Control Center by adding or removing features.
- Go to Settings > Control Center > Customize Controls for personalization.
- Edit Recordings:
- Trim, cut, or add annotations to your recordings directly from the Photos app.
Frequently Asked Questions (FAQs)
1. Can I screen record with audio on iPhone?
- Yes, you can record audio by enabling the microphone in the Screen Recording settings.
2. Where are screen recordings saved on the iPhone?
- Screen recordings are automatically saved to the Photos app.
3. Can I screen record without the red status bar?
- No, the red status bar indicates an active recording and cannot be removed.
4. Is there a limit to screen recording duration?
- The duration is flexible but consider available storage space.
5. Can I share screen recordings with others?
- Yes, easily share recordings through messaging or social media platforms.
Conclusion
Mastering the art of screen recording on your iPhone adds a dynamic dimension to your content creation. Whether it’s for educational purposes, gameplay highlights, or sharing experiences, the process is straightforward, and customization options provide flexibility. Explore the possibilities and start capturing your moments with ease!